Google Cloud –Speech-to-Text–
目標
Google Cloudが提供する、Speech-to-Text APIを利用して、音声ファイルを元に文章を書き起こすアプリケーションを作ってみる。
フロントは、ただの興味本位からPython libraryの一つであるStreamlitを利用。
注)
Speech-to-Textの利用は従量課金制であるため、認証キーの公開は行わない。
環境
- PC : Macbook Pro 2012
- OS : macOS Catalina 10.15.7
- Python : ver==3.10.1
目次
- google cloud への登録及びSpeech-to-text APIキーの作成、認証
- Pythonファイルにて文字起こしのコードを作成し、関数化
- Streamlit にてフロントの作成
- Streamlit shareingへの登録、アプリの公開
1.Google Cloud
Google Cloud公式ページより、「無料で開始」からアカウントを作成。
プロジェクトを新規作成し、コンソールから「APIとサービス>ライブラリ」。
ライブラリページにて「Cloud Speech-to-Text」を検索し、有効化する。
認証キーはJSON形式でダウンロードできる。
2.Pythonファイル作成
# import io
import os
from google.cloud import speech

#認証キーを環境変数に設定
#今回は、同階層に置いたsecret.jsonを参照し、Python fileからpathを通す
os.environ['GOOGLE_APPLICATION_CREDENTIALS'] = 'secret.json'

#以下の文字起こし処理を関数化(file_translation(音声ファイル, 言語選択))
def file_translation(speech_file, lang='日本語'):

    lang_code = {
        '英語':'en-US',
        '日本語':'ja-JP',
        '中国語':'zh'
        }

    client = speech.SpeechClient()

# Google Cloudのサンプルファイルには下記のように音声ファイルを読み込むためのコードが記載されているが、今回はStreamlitのfile_uploaderを利用するためコメントアウト。
#    with io.open(speech_file, 'rb') as f:
#       content = f.read()

    audio = speech.RecognitionAudio(content = content)

    config = speech.RecognitionConfig(
        encoding=speech.RecognitionConfig.AudioEncoding.ENCODING_UNSPECIFIED,
        sample_rate_hertz=16000,
        language_code=lang_code[lang],
    )

    response = client.recognize(config=config, audio=audio)

    for result in response.results:
        st.write(result.alternatives[0].transcript)
        #print(result)
#        print("認識結果: {}".format(result.alternatives[0].transcript))
3.Streamlitにてアプリ化
import streamlit as st
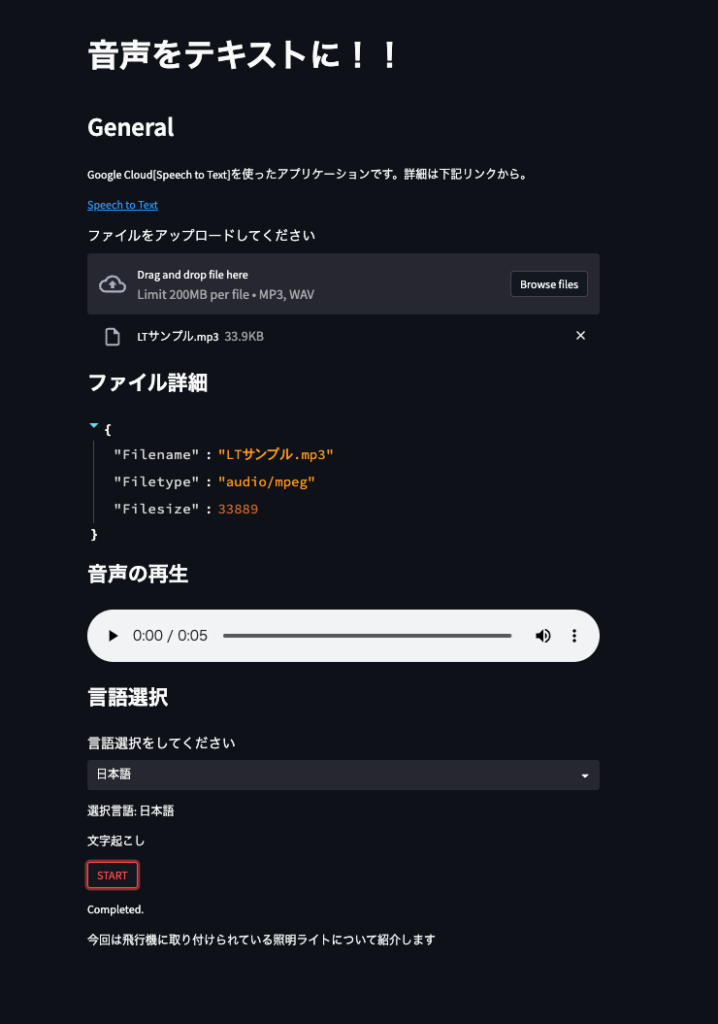
st.title('音声をテキストに!!')
st.header('General')
st.write('Google Cloud[Speech to Text]を使ったアプリケーションです。詳細は下記リンクから。')
st.markdown('<a href="https://cloud.google.com/speech-to-text?hl=ja">Speech to Text</a>' , unsafe_allow_html=True)
upload_file = st.file_uploader('ファイルをアップロードしてください' , type=['mp3','wav'])
if upload_file is not None:
content = upload_file.read()
st.subheader('ファイル詳細')
file_details = {'Filename': upload_file.name, 'Filetype': upload_file.type, 'Filesize':upload_file.size}
st.write(file_details)
st.subheader('音声の再生')
st.audio(content)
st.subheader('言語選択')
option = st.selectbox('言語選択をしてください', ('英語','日本語','中国語'))
st.write('選択言語:', option)
st.write('文字起こし')
if st.button('START'):
comment = st.empty()
comment.write('writing now ...')
file_translation(content , lang=option)
comment.write('Completed.')
4.公開
Streamlit の開発チームが提供する、Streamlit shareingというサービスを利用する。このサービスは、Githubと連携したものになっているため、事前にGithubにリポジトリを作成し、今回作成したapp.pyをpushしておく必要がある。
https://github.com/CulTech-1489/Voice-to-Text-apps
その際に必要になるファイルとして、
・app.py
・requirements.txt (新たに作成する必要あり)
今回は下記の通り、verを指定して作成した。
streamlit==1.12.2
google-cloud-speech==2.16.0
streamlit sharingへアカウント登録,連携
ここで、GithubのアカウントのプライマリのMail adressが必要。
登録が完了したら、new apps! からアプリをshareすればおっけい。